I have talked previously about drawing the viewers attention to a part of your image you want them to focus on by using leading lines, framing etc. But one of the common methods is to have the object, person or scene in focus (image is nice and sharp) and the rest of the scene is blurry.
An example of this is from a recent trip to the Blue Mountains.

OLYMPUS E-M1, Lens: M.45mm F1.8, ¹⁄₃₂₀₀ sec at ƒ / 1.8, 0 EV, Aperture priority, ISO 320
Here you can see that the glass at the front is sharp and in focus but it get more out of focus in the background.
Many professional photos you see use this technique that often sets it apart from the many point and shoot images taken.
But how is this achieved?
A shallow depth of field uses the ‘aperture’ of the lens. This looks like a series of blades with a hole on the middle, which controls the amount of light getting to the camera sensor. A dial called the aperture (f-stop) sets the size of the hole.
While a bit confusing to begin with, it looks like this:
Large hole = large aperture = Small f-number (eg; f2.8) = Shallow (small) depth of field
Small hole = small aperture = Larger f-number (eg; f/22) = Deeper (larger) depth of field
Some, but not all lenses, can go down to smaller f-number (such as f1.8). These are often called ‘portrait lenses’, or ‘fast glass’ as they allow you to take photos in darker conditions
So how do you do this on my camera?
There are different ways using your camera to achieving a shallow depth of field. You can do this by:
1. Camera that has manual settings – if your camera has the ability to change the aperture such as ‘Aperture Priority’ set it to this and select the lowest number possible (eg f2.4). The camera will expose the image correctly.
2. Look for an image of ‘persons head’ or ‘macro’ on your camera dial. This will tell the camera to select a shallow aperture.
3. If you have an iphone there are some apps that simulate a shallow depth of field because the lens on it cant achieve it normally
4. If you don’t have this still try the options below
There are other ways to help producing a shallow depth of field.
Select a longer lens: If you have the ability to use a zoom or lens with longer focal length then you have more chance of getting a shallow depth of filed. The reason is complicated and something probably best left to google if you are interested.
Get Closer: When you get really closer to your subject such as a macro the depth of field also reduces.
There are different ways to use depth of field. Examples include:
1. having the object in front in focus and a blurry background

OLYMPUS E-M1, LENS: OLYMPUS M.45mm F1.8, ¹⁄₈₀₀₀ sec at ƒ / 2.2, 0 EV, Aperture priority, ISO 320
2. Having the object in the distance in focus and foreground blurry

OLYMPUS E-M1, LENS: OLYMPUS M.45mm F1.8, ¹⁄₂₅₀₀ sec at ƒ / 1.8, 0 EV, Aperture priority, ISO 320
3. Having a transition from front to back

(see below for a little bit on the post processing of this photo)
So if you can, next time try and use your aperture priority or portrait mode and see if it makes a difference to your photos.
To finish a couple more from the trip.


The Photo of the tools leaning against the wall above have been processed in Lightroom. i like the old world look and Lightroom has a great ability to enhance this.


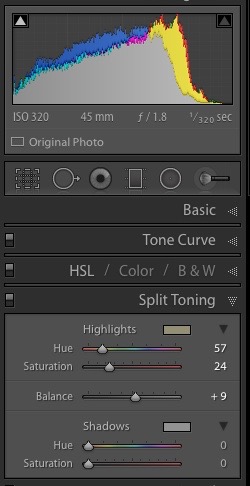
OLYMPUS E-M1, LENS: OLYMPUS M.45mm F1.8, ¹⁄₃₂₀ sec at ƒ / 1.8, 0 EV.0, Aperture priority, ISO 320
On the Left is the image with no adjustments. For the one on the right it has has 2 significant changes.
The first is split toning. This is often a matter of trial and error choosing different colours to get the effect you want.
The second was playing with the tone curve. The intention was to make the mid-tones lighter (middle of the curve). There are different ways in lightroom to play with this including selecting the circle in top right then going to your photo and selecting a point then dragging the mouse up or down. Alternatively you can move the sliders.
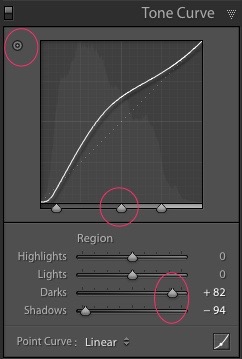
Now I must admit i rarely use Tone Curve as often the General Adjustments are all I need but sometimes it is fun to play around and see what you get.
It has also been finished with some DE-saturation, less clarity and also a bit of vignetting.